首先我们需要了解一下 Spring Boot 中 starter 的概念,Spring Boot 相比 Spring 有以下几个优势 :
创建独立(standalone)的 Spring 应用程序
相比 Spring,Spring Boot 不需要再打包为 war 然后部署到 Tomcat 的服务器上。Spring Boot 内嵌 Tomcat、Jetty 或者 Undertow
提供可选的 starter 来简化项目的构建配置 自动配置 Spring 相关 Bean 和第三方库的相关配置
无需生成代码,无需 XML 配置
提供监控(metrics)、运行状况检查、外部化配置的功能
从上面 Spring Boot 的 features 我们可以发现,starter 实际上是为 Spring Boot 提供了一个简化项目构建配置的能力,可以让使用者将精力放在业务逻辑的开发中,而不需要去烦恼如何对一些依赖进行配置,因为这些配置都已经通过 starter 集成到了 Spring Boot 当中,可以作为 Spring Boot 开箱即用的部分,starter 中的 Bean 都已经注入到了 IOC 容器当中,而不需要我们再去手动配置。
首先我们先来看一下我们自己项目中的 Bean 的依赖注入是如何实现的。在主类中有一个注解 @SpringBootApplication,该注解实际上是一个复合注解,部分代码如下所示:
@Retention(RetentionPolicy.RUNTIME) @Documented @Inherited @SpringBootConfiguration @EnableAutoConfiguration @ComponentScan(excludeFilters = { @Filter(type = FilterType.CUSTOM, classes = TypeExcludeFilter.class), @Filter(type = FilterType.CUSTOM, classes = AutoConfigurationExcludeFilter.class) }) public @interface SpringBootApplication { @AliasFor(annotation = EnableAutoConfiguration.class) Class<?>[] exclude() default {}; @AliasFor(annotation = EnableAutoConfiguration.class) String[] excludeName() default {}; @AliasFor(annotation = ComponentScan.class, attribute = "basePackages") String[] scanBasePackages() default {}; @AliasFor(annotation = ComponentScan.class, attribute = "basePackageClasses") Class<?>[] scanBasePackageClasses() default {}; @AliasFor(annotation = ComponentScan.class, attribute = "nameGenerator") Class<? extends BeanNameGenerator > nameGenerator() default BeanNameGenerator.class; @AliasFor(annotation = Configuration.class) boolean proxyBeanMethods () default true ; }
可以看到该注解主要提供了两个能力:
@EnableAutoConfiguration,实际上就是使我们自己写的配置类生效@ComponentScan,该注解实际上就是去扫描对应路径(默认为主类所在 package 下的路径)中的 Bean,并将其加入到 IOC 容器当中。
我们会发现,上面的 @SpringbootApplication 实际上作用的是项目中的相关 Bean,对于依赖的 Bean 好像并没有去扫描和提供依赖注入的功能,那么这些依赖是如何被注入到 Spring IOC 容器中呢?实际上是通过 spring.fatories 这样的一个文件来指定
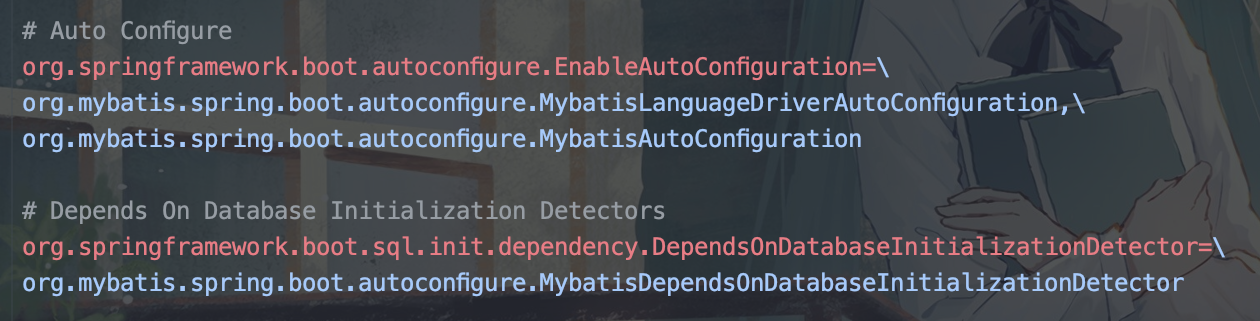
starter 能够注入 IOC 容器的原理是通过 resources/META-INF/spring.factories 这个文件实现的,下面以 spring-boot-mybatis-starter 为例子来看一下里面究竟实现了什么:
可以看到在 spring.factories 文件中,spring-boot-mybatis-starter 定义了几个自定义的 AutoConfiguration,通过在该文件中声明全限定名来告诉 IOC 容器在加载的时候应该把这个类的 Configuration 作为配置加入到 Spring 容器中,同时对 Configuration 中声明的 Bean,也应该注入到 IOC 容器当中。下面我们来看一下 org.mybatis.spring.boot.autoconfigure.MybatisAutoConfiguration 的代码:
@org .springframework.context.annotation.Configuration@ConditionalOnClass({ SqlSessionFactory.class, SqlSessionFactoryBean.class }) @ConditionalOnSingleCandidate(DataSource.class) @EnableConfigurationProperties(MybatisProperties.class) @AutoConfigureAfter({ DataSourceAutoConfiguration.class, MybatisLanguageDriverAutoConfiguration.class }) public class MybatisAutoConfiguration implements InitializingBean { @Bean @ConditionalOnMissingBean public SqlSessionTemplate sqlSessionTemplate (SqlSessionFactory sqlSessionFactory) { ExecutorType executorType = this .properties.getExecutorType(); if (executorType != null ) { return new SqlSessionTemplate (sqlSessionFactory, executorType); } else { return new SqlSessionTemplate (sqlSessionFactory); } } }
可以看到其中有几个注解:
@Configuration:和我们平时声明自定义配置类一样,该注解同样是将该类声明为一个配置类@ConditionalOnClass:只有在里面指定的 class 在 classpath 下,才会加载该 configuration(为了保证 classpath 中有所需的 class,从而可以声明对应的 Bean)@ConditionalOnSingleCandidate:只有在 BeanFactory 下只有唯一候选 Bean 的时候才会加载该 Configuration(其实就是为了防止冲突)@AutoConfigureAfter:只有在指定的 configuration 加载之后才能加载该 configuration
需要注意的是,在 Spring Boot 2.7.0 开始,Spring 官方开始逐渐不推荐使用 spring.factories 来声明 starter 中需要配置的 Bean,而是改用 META-INF/spring/org.springframework.boot.autoconfigure.AutoConfiguration.imports 的文件来配置,其规范就是用单行指定全限定名的配置即可
Spring Boot 2.7.0 RELEASE 里原文描述如下:
If you have created your own auto-configurations, you should move the registration from spring.factories under the org.springframework.boot.autoconfigure.EnableAutoConfiguration key to a new file named META-INF/spring/org.springframework.boot.autoconfigure.AutoConfiguration.imports. Rather than a single comma-separate list, each line contains the fully qualified name of an auto-configuration class.
那么 Spring Boot 是如何通过 spring.factories 中找到对应的 class 呢,实际上是通过 SpringFactoriesLoader 来实现的,部分代码如下:
public final class SpringFactoriesLoader { public static final String FACTORIES_RESOURCE_LOCATION = "META-INF/spring.factories" ; static final Map<ClassLoader, Map<String, List<String>>> cache = new ConcurrentReferenceHashMap <>(); public static List<String> loadFactoryNames (Class<?> factoryType, @Nullable ClassLoader classLoader) { ClassLoader classLoaderToUse = classLoader; if (classLoaderToUse == null ) { classLoaderToUse = SpringFactoriesLoader.class.getClassLoader(); } String factoryTypeName = factoryType.getName(); return loadSpringFactories(classLoaderToUse).getOrDefault(factoryTypeName, Collections.emptyList()); } private static Map<String, List<String>> loadSpringFactories (ClassLoader classLoader) { Map<String, List<String>> result = cache.get(classLoader); if (result != null ) { return result; } result = new HashMap <>(); try { Enumeration<URL> urls = classLoader.getResources(FACTORIES_RESOURCE_LOCATION); while (urls.hasMoreElements()) { URL url = urls.nextElement(); UrlResource resource = new UrlResource (url); Properties properties = PropertiesLoaderUtils.loadProperties(resource); for (Map.Entry<?, ?> entry : properties.entrySet()) { String factoryTypeName = ((String) entry.getKey()).trim(); String[] factoryImplementationNames = StringUtils.commaDelimitedListToStringArray((String) entry.getValue()); for (String factoryImplementationName : factoryImplementationNames) { result.computeIfAbsent(factoryTypeName, key -> new ArrayList <>()).add(factoryImplementationName.trim()); } } } result.replaceAll((factoryType, implementations) -> implementations.stream().distinct() .collect(Collectors.collectingAndThen(Collectors.toList(), Collections::unmodifiableList))); cache.put(classLoader, result); } catch (IOException ex) { throw new IllegalArgumentException ("Unable to load factories from location [" + FACTORIES_RESOURCE_LOCATION + "]" , ex); } return result; } }
可以看到实际上就是去解析了 spring.factories 这个文件,然后加载到一个 Map<String, List<String>> 当中,然后通过对应的 factory 加载对应的 configuration。